Who can participate in the Science Fair?
Where and when will the Science Fair take place?
How can I register?
Until when can I register?
Do I need to bring anything on the day itself?
What does the day look like?
My school does not participate in GLOBE, can I still join?
How can I best prepare for the Science Fair?
Can I win prizes at the Science Fair?
 There are various prizes to be won at the Science Fair:
1. Jury award (awarded by the scientific jury)
2. Audience award (winner is chosen by the audience)
3. GLOBE Bee Game award (best team in the outdoor activity)
In which language should I create the poster and give the presentation?
Who can I contact if I have a question?
Step 1
Orientation
What do you want to investigate?
The first step is to choose a topic that you and your team want to research. Within GLOBE, there are many different research projects to choose from. By exploring these projects, you can see what is possible and select a theme for your own study!
Each GLOBE project comes with a protocol that explains step-by-step how to conduct the research and which measurements to take. These protocols are a great source of inspiration and show you exactly how professional scientists work. You can find these protocols listed under the various research projects.
Have you found a topic? Great! Now you can dive into the following activities to better understand your subject and start thinking about a potential research question:
- Read the protocol carefully and identify which measurements are required.
- Test the measuring instruments and experiment with how they work.
- Research background information on your chosen topic.
Discuss your findings with your team or your teacher.
What is the outcome of this orientation phase? By the end of this step, you should have a list of questions or ideas that you find interesting to investigate. This list will serve as the foundation for drafting a clear research question in Step 2.
TIP: High-quality research often focuses on things that aren’t fully understood yet. Try to look for “knowledge gaps”—questions that don’t have a simple or obvious answer.
Step 2
Pose questions
What exactly are you going to investigate?
During the orientation phase, many questions likely popped up. Now, it’s time to take those ideas and turn them into one clear main research question. This is the core of your entire project and the question you will answer with your poster presentation at the Science Fair! Everything you measure and analyze will ultimately serve to answer this question.
What makes a research question “good”?
A strong research question should follow these criteria:
- Specific: You know exactly what you are investigating.
- Measurable: You can find an answer through experiments or data collection.
- Feasible: You can complete it within your timeframe and with the resources available to you.
Sub-questions and Hypotheses
Once you have your main question, you can move on to sub-questions. Think of these as smaller stepping stones that help you gather information bit by bit. By answering these smaller questions first, you build the knowledge needed to solve the “big puzzle” (your main question).
After setting your questions, you can write down your hypothesis. This is your educated guess: What do you expect the results will show? While a hypothesis isn’t strictly mandatory, it is very helpful. Make sure you can explain why you expect a certain outcome, perhaps using the information you gathered in Step 1.
Can you still change your question later?
Absolutely! Your research question isn’t set in stone after Step 2. As you move on to your research plan (Step 3), you might realize your original question is too broad, too difficult, or hard to measure. If that happens, feel free to refine or adjust your question so your project remains doable.
TIP: If you decide to change your question, re-check it against the criteria in the “Doing Research” worksheet and perhaps ask your teacher for a quick review.
Step 3
Plan investigation
How are you going to answer your questions?
Now that you have a research question, the next step is to figure out exactly how you will get the answers ready in time for the Science Fair. You do this by creating a research plan.
Why is a research plan important?
A solid plan largely determines how smoothly your research will go. In the world of science, researchers often spend up to 30% of their time on the first three steps of the research cycle. While that seems like a lot, a strong foundation prevents major problems or wasted time later on.
What should you include in your plan?
In your research plan, you will answer several key questions about your process. Putting these answers on paper ensures you can refer back to them when creating your poster, and it helps your team make clear agreements. Feel free to add any extra questions that are relevant to your specific project!
Preparation
- What knowledge do you still need to acquire to answer your question?
- Which sources (books, websites, experts) will you use?
- Roles: Who is responsible for what within your group?
- Who can you ask for help if you get stuck?
Methodology
- What specific measurements or observations will you perform?
- How often and at what times will you take these measurements?
- What equipment or tools do you need? Are they available at school?
Data and Analysis
- How will you store and organize your data?
- How will you ensure your records are kept neat and accurate?
- What data sources will you use?
- How do you plan to analyze the data (e.g., averages, graphs, comparisons)?
The Reality Check
This is a great moment to pause and check: Does the plan still align with your research question?
- Yes? You are ready to move on to the next step!
No? Either adjust your plan (Step 3) or refine your research question (Step 2).
TIP: Take plenty of photos and keep a logbook of your research process. This will be incredibly helpful later when you are designing your poster!
Step 4
Assemble data
Hoe gaat het verzamelen van data?
Now it’s time for action! You are going to perform the measurements, observations, or interviews according to your research plan. A good start is half the battle, so make sure you are well-prepared before you begin collecting data.
How do you prepare for your measurements?
Every project is unique, but these steps apply to almost every study:
- Determine the “where and when”: Decide exactly where and at what time you will take your measurements.
- Prepare your equipment: Set up all your measuring instruments and tools beforehand.
- Ready your data storage: Ensure you have an organized way to record your data (as discussed in Step 3).
What should you pay close attention to?
- Safety First!! Always work safely and use equipment exactly as instructed.
- Accuracy: Ensure your measurements are as precise as possible to make your research credible.
- Pilot Testing: Perform a few test measurements first. This allows you to practice with the equipment and check if everything is working correctly. If you are using a survey, test it on a few people first to see if the questions are clear.
- Sufficient Data: It is better to collect too much data than too little. Having too few data points can make it very difficult to draw reliable conclusions.
- Note the Circumstances: Write down external factors that might influence your results, such as the weather, location, time of day, or other surroundings.
- Secure Your Records: Log your measurements clearly and save them in a location where the whole team can access them (e.g., a shared cloud folder).
TIP: Keep a log of noteworthy results during the process. This includes things that went differently than expected, data that surprised you because it contradicted your hypothesis, or interesting details you want to look into later. These notes will be extremely valuable when you start analyzing your results and designing your poster.
Step 5
Analyse data
What does the data tell you?
Now that you have collected all your data, it’s time to figure out what it actually means. This process is called analysis. Analyzing means processing your raw data so that you can draw conclusions, answer your sub-questions, and ultimately find the answer to your main research question.
How to present your data clearly?
Try to present your data as clearly and concisely as possible. Visual tools are often much better than long lists of numbers. Depending on your research, you can use:
- Graphs (line graphs for trends, bar charts for comparisons)
- Diagrams (to show relationships or processes)
- Maps (if your research is location-based)
- Tables (to organize raw figures)
Important: For every figure (graph, map, or diagram), write a brief description explaining exactly what the reader is looking at. You may need to process your data first—for example, by calculating averages per measurement site—before putting it into a graph.
Tips for analyzing your measurements
- Watch out for outliers: Sometimes a measurement is completely different from the rest; we call these “outliers.” Think about how to handle them. Can they be explained by something unusual that happened during the measurement (refer back to your notes from Step 4)?
- Use reference data: If possible, compare your findings with data from official sources, such as reference stations (e.g., KNMI or RIVM in the Netherlands).
- Look for patterns: Is there a pattern over time? Does the data change during the day or over the weeks?
- Seek explanations: Try to explain why you see these results. Use your background research or other relevant environmental data to back up your claims.
What should you include in your analysis report?
- Observations: What stands out most in the data?
- Explanations: What are the possible reasons for these findings?
- Connections: How do these results help you answer your sub-questions and your main research question?
Step 6
Document conclusions
What can we conclude from the data?
Now that you have analyzed your data, it’s time to answer the big question: what does this mean for your research? A strong conclusion is more than just a simple “yes” or “no” to your research question. It requires you to look critically at your work and think deeply about the significance of your results.
What belongs in a great conclusion?
- The Answer: What does the data show? Based on the answers to your sub-questions, what is the final answer to your main research question
- Comparison: Do your results match what is already known about this topic? Did they confirm your hypothesis, or were they completely unexpected?
- Reliability: How certain are you of your measurements? Were there external factors (like weather or equipment issues) that might have influenced your results?
- Self-Reflection: What went well during the research? What could have been improved? What is the most important new insight your study provides?
- Future Research: If you were to do this study again, what would you change? What new questions have come up? How could a follow-up study explore those questions?
TIP: Think about the broader impact. Consider the consequences for the environment, local policy, or public awareness. These reflections will form the “Discussion and Conclusion” section of your poster for the Science Fair!
Step 7
Creating a research poster
How are we going to present our research?
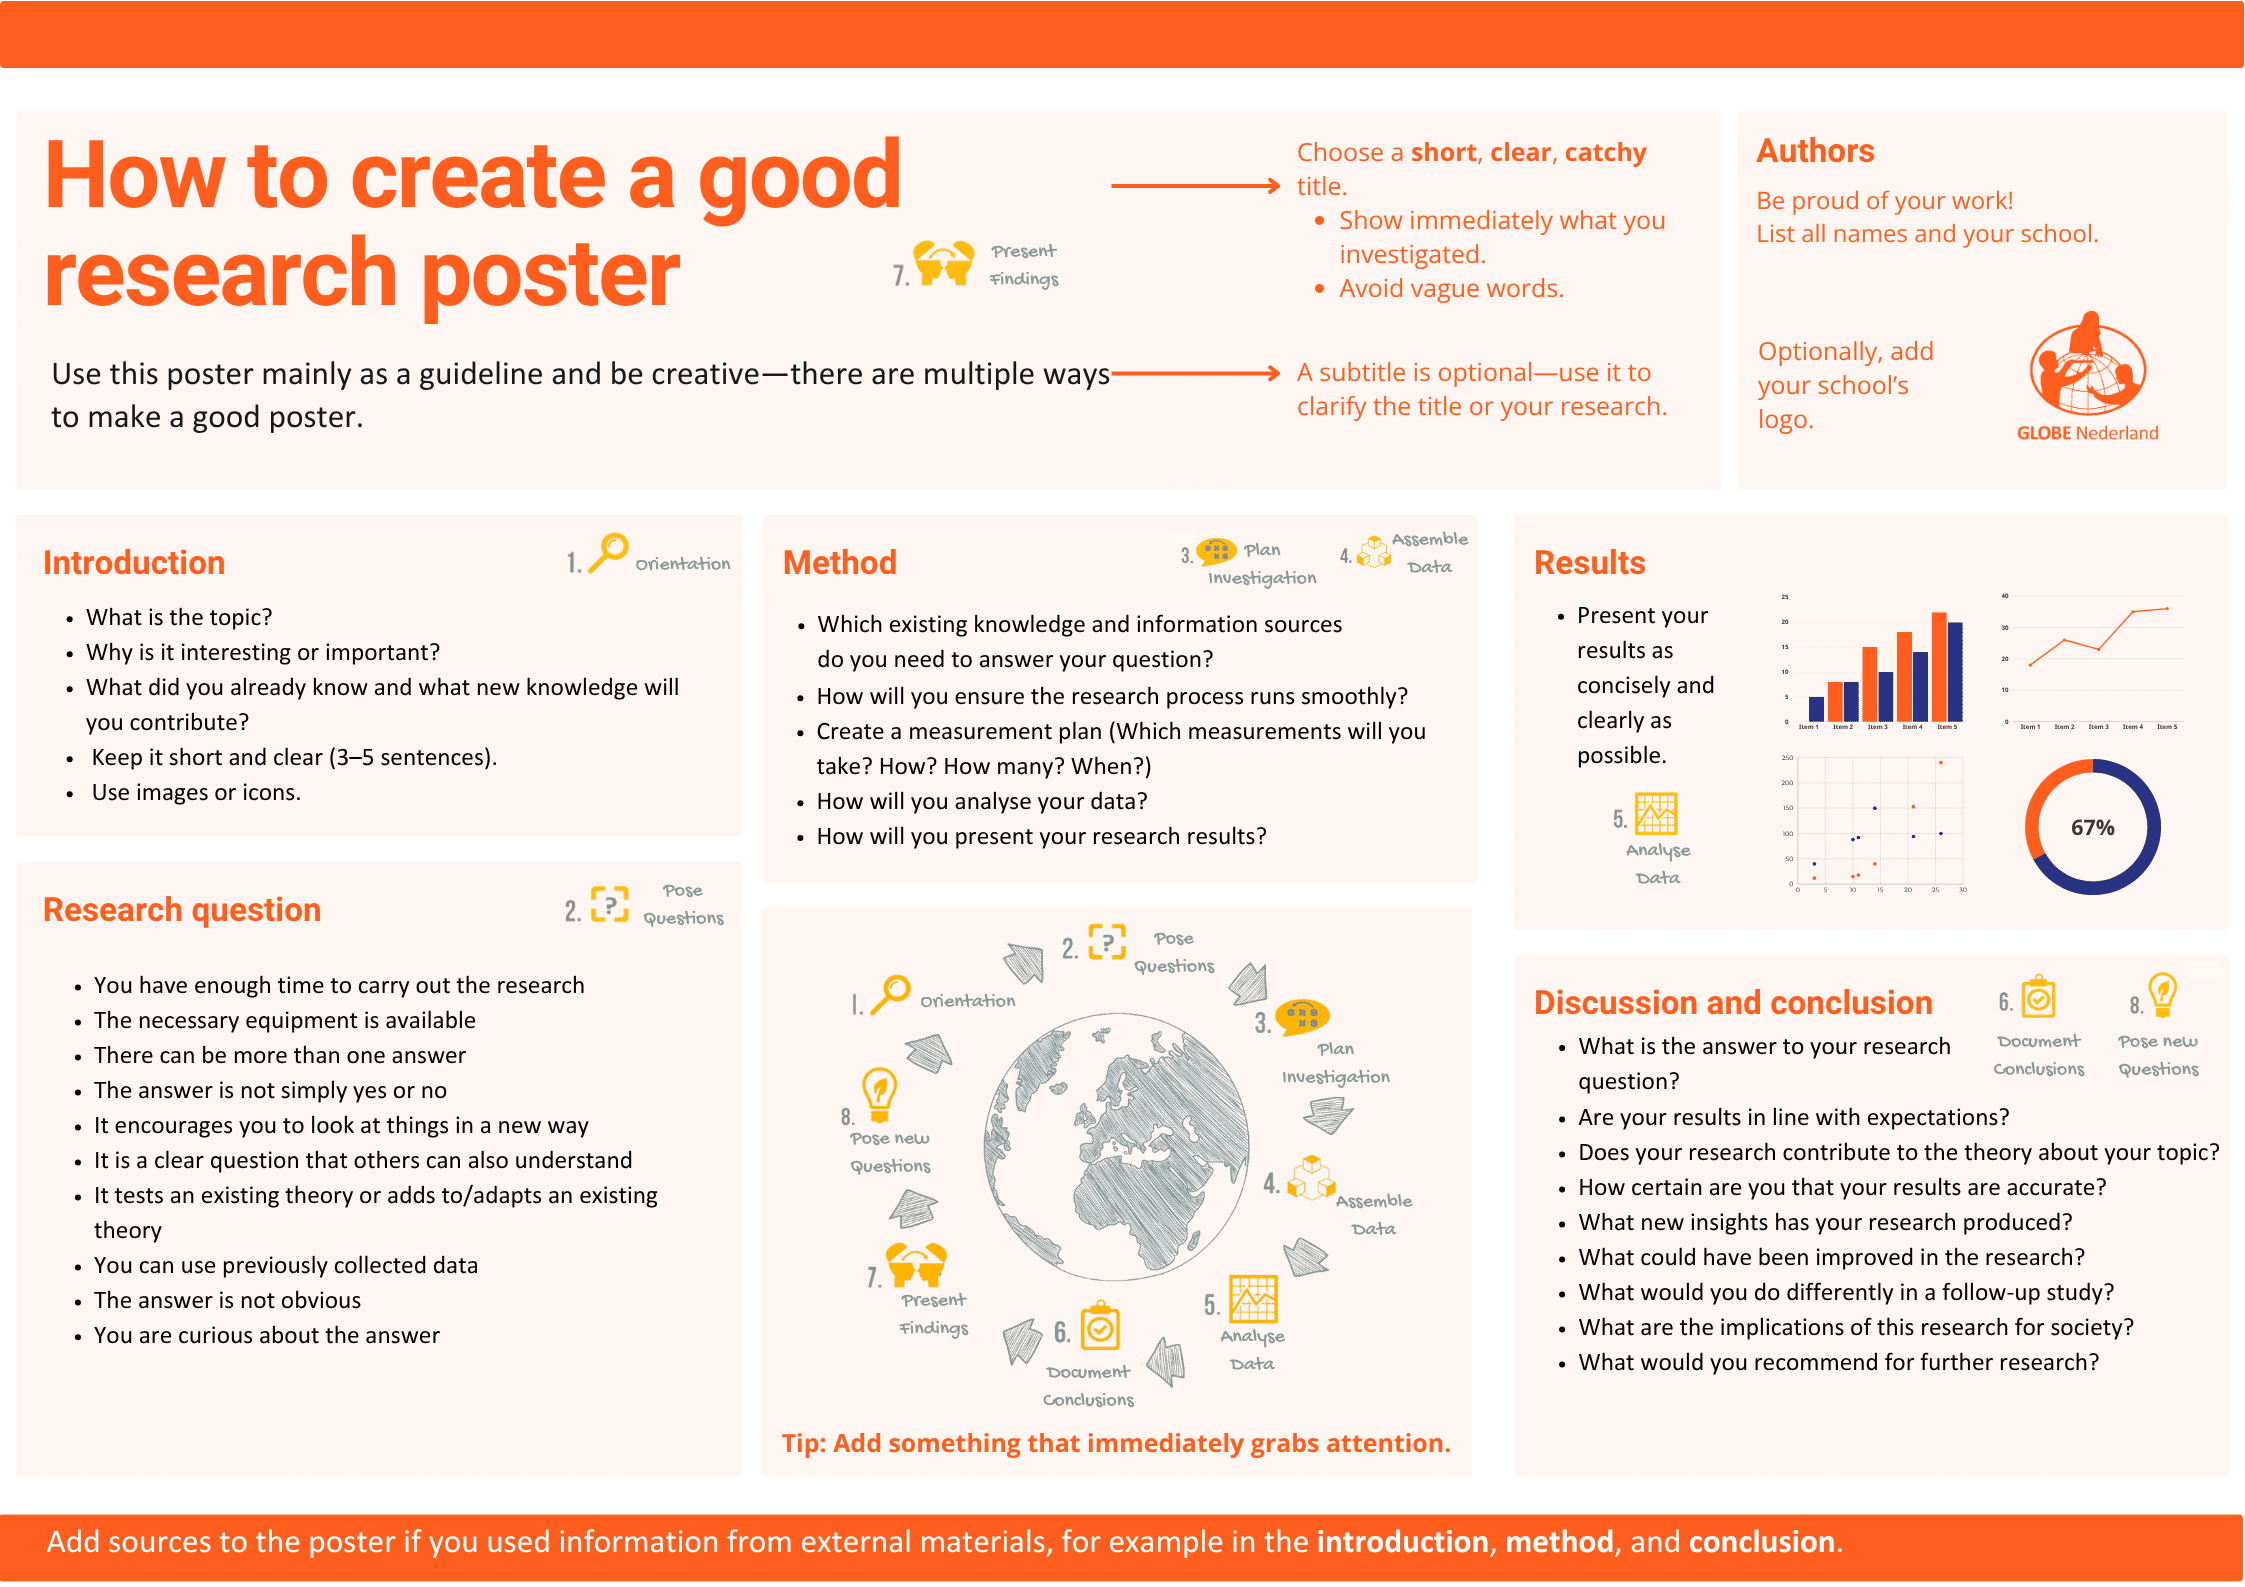
Now it’s time to make your research visible to others so everyone can see what you’ve discovered! On June 5, you will do this using a research poster. This poster should show at a glance what you investigated, how you did it, and what you found.
Don’t worry—we’ll guide you through creating a clear, organized, and eye-catching poster that helps everyone understand your project instantly.
What belongs on a high-quality research poster?
- Title: Choose a short, clear, and catchy title. Make sure it immediately shows what your research is about and avoid vague language.
- Introduction: Briefly explain the topic, why it is interesting or important, and what your research adds to the subject. Keep this concise (about 3–5 sentences). Use the information from Step 1!
- Research Question: Clearly state exactly what you wanted to investigate, why that question is interesting, and include your sub-questions. Use the information from Step 2!
- Methodology: Explain how you conducted the research. Which measurements or observations did you perform? What equipment or data did you use? How often and when did you take measurements? Use the information from Steps 3 and 4!
- Results: Present your data as concisely and clearly as possible. Use tools like graphs, diagrams, maps, or tables. Include a brief caption for every figure explaining exactly what we are seeing. Use the information from Steps 4 and 5!
- Discussion and Conclusion: What is the answer to your research question? What stood out in your results? How certain are you of the outcomes? What would you do differently in a follow-up study? Use the information from Step 6!
- Authors and Sources: List the names of all researchers, your school, and the sources you used for your background information.
TIP: A good poster grabs attention. Use clear visuals, keep text to a minimum, and ensure the layout is easy to follow at a glance.
Step 8
Share your results at the Science Fair
What’s next? Research only becomes truly valuable when you share it with others. This is a vital part of the scientific world, and your research is no exception! Sometimes, student findings can provide new insights into critical topics like public health or the environment.
On June 5, you will present the poster you created at the GLOBE Science Fair. This is an inspiring day where students from all over the Netherlands present their GLOBE research to a scientific jury and to each other.
It might feel a little exciting or even a bit nerve-wracking, but remember: after these seven steps, you are the experts on your project! Don’t worry; the day is all about learning from one another and asking questions.
Tips for Presenting Your Research
- Speak clearly and calmly: Take your time to explain your steps.
- Practice together: Do a few dry runs so everyone on the team knows exactly what to say.
- Embrace questions: Questions are a great thing! They mean people are interested and want to learn from your work.
- Stay confident: You know your research better than anyone else in the room!
Looking Ahead
In science, answering one question often leads to new questions. This is perfectly normal! These new ideas could be the starting point for a brand-new project.
- Consider sharing your ideas with your teacher so future students can build upon your work.
- Who knows… this research might even inspire the topic for your Profile Research Project (PWS)!